

Farmer is a F# way of creating Azure infrastracture. It wraps ARM templates which are difficult to read and contains reduntant code (if we may call json in that way :)). It also gives a chance for FSharp ecosystem to stay within, which is super handy.
The post objectives
By the end of this article, you will be able to:
- create Farmer app handling multiple (different) environments
- deploy Azure infrastracture from Farmer app using Azure DevOps
What are we going to create?
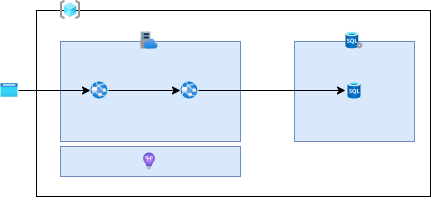
We will prepare architecture for 3-tiers app with following resources:
- frontend app
- backend app
- SQL database
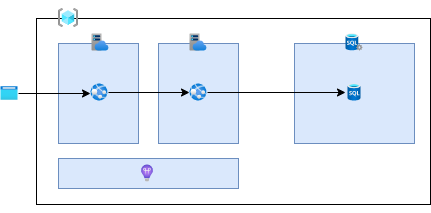
Our plan is to create two environments dev and staging. We will also apply asmall cost optimization for dev enviroment, which is shared App Service Plan for frontend and backend app.
Creating Farmer app
It is very easy to create Farmer app. All what you need is to run belowa commands:
dotnet new console -lang F#
dotnet add package Farmer
After that you are ready to develop your first template. I truly recommend go through Farmer documentation.
Deployment mode
Deployment guidance describes 3 ways of deploying Farmer temmplates:
- staying within Farmer app
- generating ARM template from Farmer app and continue deployment process with ARM template
- starting with Farmer app as initial creation of ARM template and later modify that template manually
I decided to combine option one and two. Option one for me was very handy at development time when I can generate ARM template and in that way visual verify what set of resources I’m going to create. Furthermore, I don’t want to each time to deploy single change to Azure, but I still want to have a way of veryfing my development effort. On the other hand I want to stay with Farmer for real deployment. This is why I introduced isDryRun flag which is passed as an argumnet to the app. If it is set to true, the app will generate ARM template, otherwise it will deploy to Azure. It boils down to simple check:
let executeDeployment =
    match isDryRun with
    | true ->  Writer.quickWrite  prefix
    | false ->
        let deploy deployment =

            printf "Deploying resources into %s using Farmer\n" rgName

            Deploy.execute rgName [$"password-for-{sqlServerName}", sqlPassword ] deployment
            |> ignore
            printf "Deployment of resources into %s complete!\n" rgName

        deploy

deployment
|> executeDeployment
Above code for dry run creates ARM templates calling Writer.quickWrite, otherwise make deployment via Deploy.execute.
Multple environments
At the begining we assumed that we are going to create two environments dev and staging and to handle the difference between them we need to know in what context the app runs. For rhar reason I created another paramater passed at runtime. Based on that paramater Farmer app creates resources accordingly to our assumption.
let createServicePlans env =
    let servicePlans = Dictionary<_,_>()
    match env with
    | "dev" ->
        let plan = servicePlan {
            name $"{prefix}-appplan"
            sku WebApp.Sku.F1
        }
        servicePlans.Add(frontAppName, plan)
        servicePlans.Add(backAppName, plan)
    | "staging" ->
        let frontPlan = servicePlan {
            name $"{prefix}-fornt-appplan"
            sku WebApp.Sku.B1
        }
        servicePlans.Add(frontAppName, frontPlan)
        let backPlan = servicePlan {
            name $"{prefix}-back-appplan"
            sku WebApp.Sku.B1
        }
        servicePlans.Add(backAppName, backPlan)
    | _-> failwith("Error: returns " + env)

    servicePlans

let servicePlans = createServicePlans env

let frontApp = webApp {
    name frontAppName
    link_to_service_plan servicePlans.[frontAppName]
    link_to_app_insights ai
}

let backApp = webApp {
    name backAppName
    link_to_service_plan servicePlans.[backAppName]
    link_to_app_insights ai
}

let uniquePlans = servicePlans.Values
                    |> Seq.distinct
                    |> Seq.map (fun plan -> plan :> IBuilder)
                    |> Seq.toList

let deployment = arm {
    location Location.WestEurope
    add_resources uniquePlans
    add_resource ai
    add_resource frontApp
    add_resource backApp
    add_resource databases
}
There is no magic and it is easy to follow. And for me this is a power of using real programming language like F#. You have at your hands tool which you know and familair with. There is no need to learn a new syntax, which should result in faster development. (I skipped in above snippet identical code for both environment)
Full Farmer app code
You can find whole code on GitHub repository - fs-advent-2020-farmer or below
open Farmer
open Farmer.Builders
open System.Collections.Generic
open Farmer.Sql

[<EntryPoint>]
let main argv =

    let isDryRun : bool =
        match argv.[0] with
        | "true" | "True" -> true
        | "false" | "False" -> false
        | _-> failwith("Error: returns " + argv.[0])

    let project = argv.[1]
    let env = argv.[2]
    let sqlPassword = argv.[3]

    //gran campo nevado
    let prefix = $"{project}-{env}"
    let rgName = $"{prefix}-rg"
    let frontAppName = $"{prefix}-front-app"
    let backAppName = $"{prefix}-back-app"
    let sqlServerName = $"{prefix}-sql-server"

    let createServicePlans env =
        let servicePlans = Dictionary<_,_>()
        match env with
        | "dev" ->
            let plan = servicePlan {
                name $"{prefix}-appplan"
                sku WebApp.Sku.F1
            }
            servicePlans.Add(frontAppName, plan)
            servicePlans.Add(backAppName, plan)
        | "staging" ->
            let frontPlan = servicePlan {
                name $"{prefix}-fornt-appplan"
                sku WebApp.Sku.B1
            }
            servicePlans.Add(frontAppName, frontPlan)
            let backPlan = servicePlan {
                name $"{prefix}-back-appplan"
                sku WebApp.Sku.B1
            }
            servicePlans.Add(backAppName, backPlan)
        | _-> failwith("Error: returns " + env)

        servicePlans

    let servicePlans = createServicePlans env

    let ai = appInsights {
        name $"{prefix}-appInisght"
    }

    let frontApp = webApp {
        name frontAppName
        link_to_service_plan servicePlans.[frontAppName]
        link_to_app_insights ai
    }

    let backApp = webApp {
        name backAppName
        link_to_service_plan servicePlans.[backAppName]
        link_to_app_insights ai
    }

    let uniquePlans = servicePlans.Values
                        |> Seq.distinct
                        |> Seq.map (fun plan -> plan :> IBuilder)
                        |> Seq.toList

    let databases = sqlServer {
        name sqlServerName
        admin_username "admin_username"
        enable_azure_firewall

        elastic_pool_name "mypool"
        elastic_pool_sku PoolSku.Basic100

        add_databases [
            sqlDb { name $"{prefix}-sql"; sku Basic }
        ]
    }

    let deployment = arm {
        location Location.WestEurope
        add_resources uniquePlans
        add_resource ai
        add_resource frontApp
        add_resource backApp
        add_resource databases
    }

    let executeDeployment =
        match isDryRun with
        | true ->  Writer.quickWrite  prefix
        | false ->
            let deploy deployment =

                printf "Deploying resources into %s using Farmer\n" rgName

                Deploy.execute rgName [$"password-for-{sqlServerName}", sqlPassword ] deployment
                |> ignore
                printf "Deployment of resources into %s complete!\n" rgName

            deploy

    deployment
    |> executeDeployment

    0 // return an integer exit code
Deployment from Azure DevOps
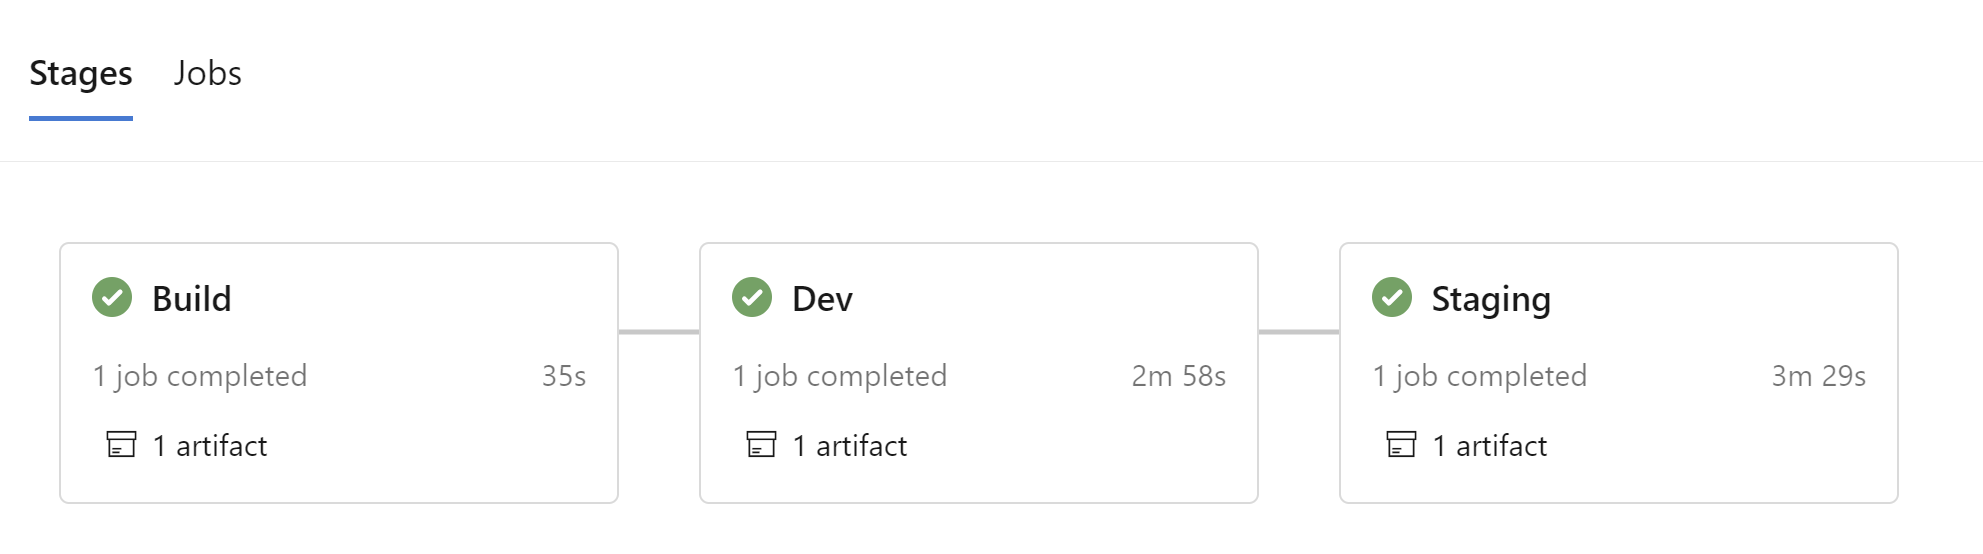
We will create multi stage pipeline with 3 stages:
- build
- deploy to
dev - deploy to
staging
Build stage
In this stage we simply compile and publish our application for later usage in deployment stages.
- stage: Build
jobs:
- job: Build
    steps:
    - script: |
        dotnet restore
        dotnet build
        dotnet publish -o $(Pipeline.Workspace)
    displayName: 'Build the app'
    workingDirectory: "src"
    - task: PublishPipelineArtifact@1
    displayName: "Publish Farmer artifact"
    inputs:
        targetPath: '$(Pipeline.Workspace)'
        artifactName: 'farmer'
Deployment stages
Here we have two stages. Each of them:
- downloads compiled farmer app (this is done out of the box - deployment job just does it for you, as it downloads all avialable artifacts)
- creates ARM templates and publish it as artifact (this step is not necessary, I just added it because I wanted to have easily available information what exactly was deployed)
- deploys resources to Azure Resource Group
All is fairly straighforward and the only one part which we need to figure out is authentication. It would be good if it doesn’t affect our app. And this is another point, where Farmer doesn’t dissapoint us:
We can levarage this and use just Azure CLI task to handle outhentication without touching the app.
- stage: Dev
  jobs:
  - deployment: DevDeploy
    environment: '$(project)-dev'
    variables:
    env: dev
    strategy:
    runOnce:
      deploy:
        steps:
        - script: dotnet FarmerFun.dll true $(project) $(env) $(dev-sql-password)
          displayName: "Create $(env) template"
          workingDirectory: '$(Pipeline.Workspace)/farmer'
        - task: PublishPipelineArtifact@1
          displayName: "Publish $(env) template"
          inputs:
            targetPath: '$(Pipeline.Workspace)/farmer/$(project)-$(env).json'
            artifactName: '$(env)'
        - task: AzureCLI@2
          displayName: "Deploy $(env) resources"
          inputs:
            azureSubscription: 'full-subscription'
            scriptType: 'pscore'
            scriptLocation: 'inlineScript'
            inlineScript: dotnet FarmerFun.dll false $(project) $(env) $(dev-sql-password)
            workingDirectory: '$(Pipeline.Workspace)/farmer'
Here is the example of YAML code for dev stage. I skipped staging as they actually the same with just different paramaters. This is a perfect candidate for template.
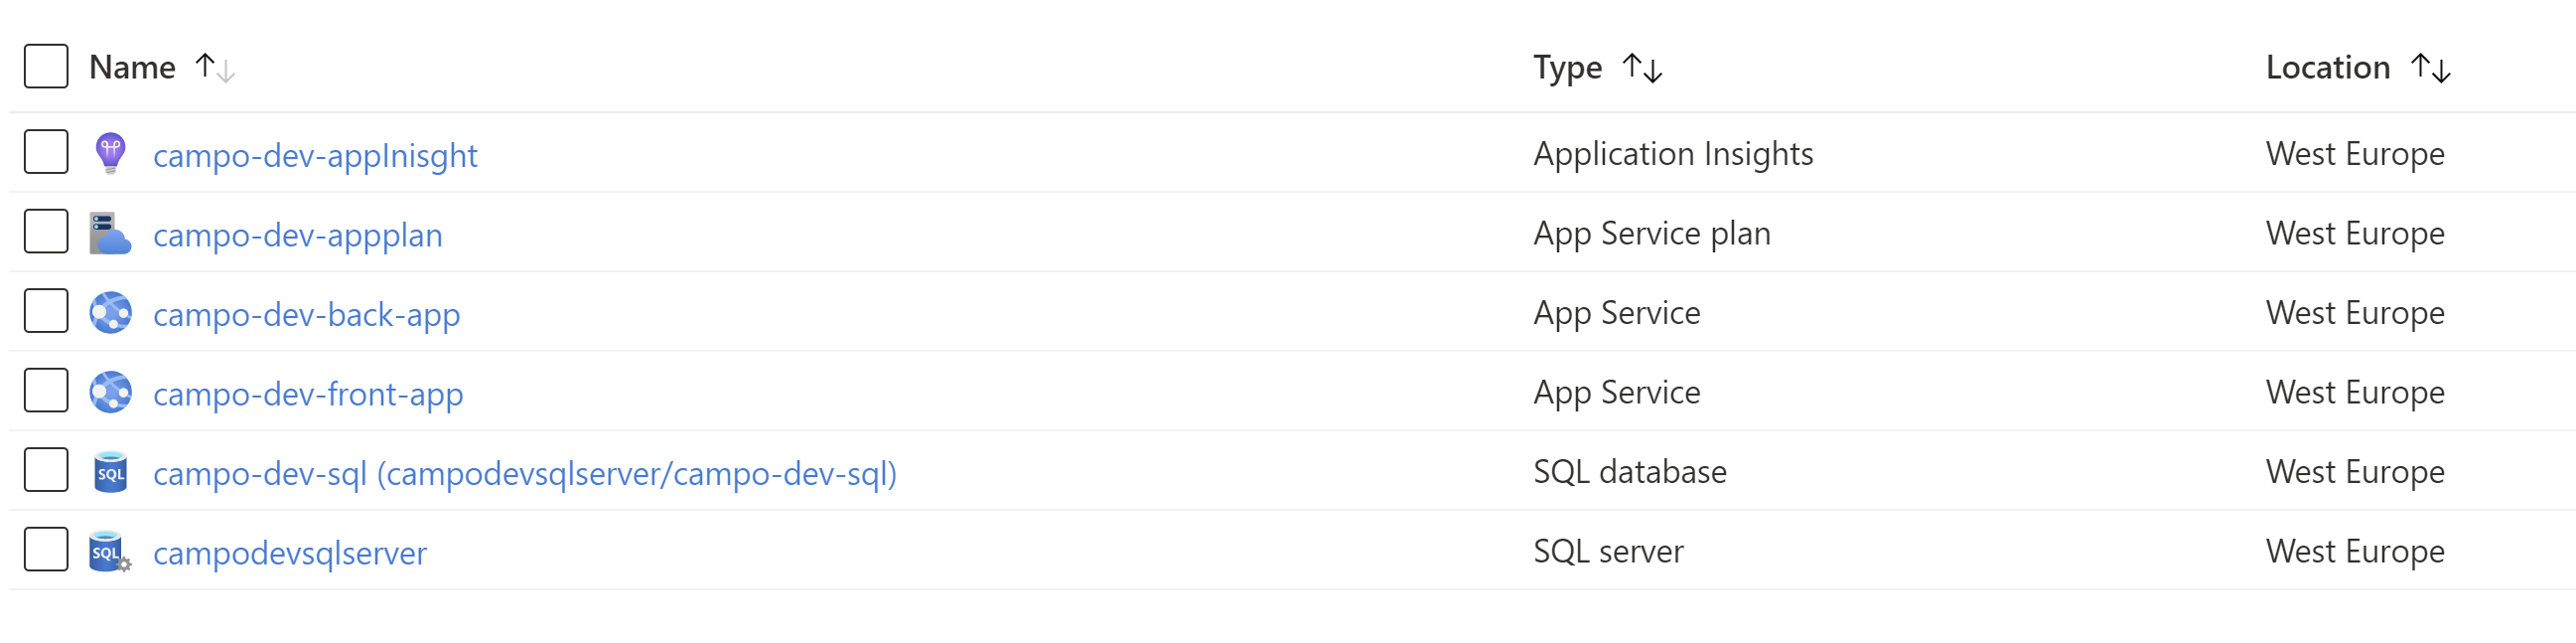
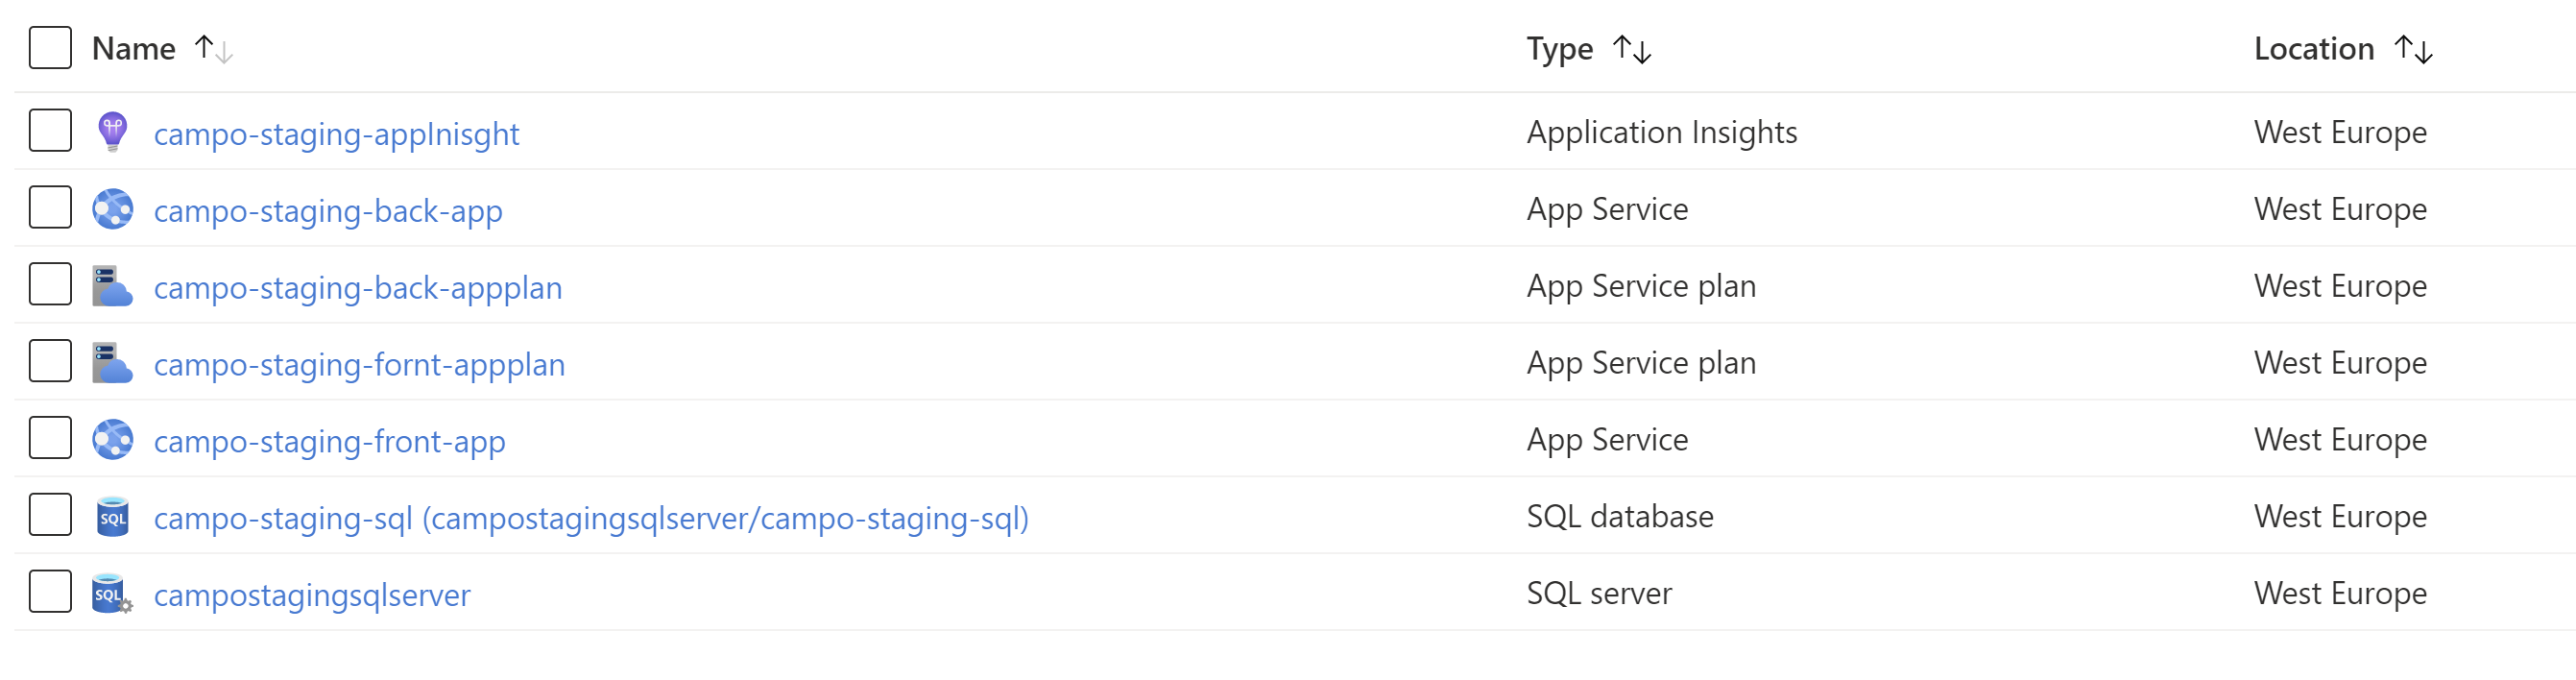
And now when we run this we will get all resourced deployed to our resource groups.
Conclusion
Farmer is really handy wrapper which moves you away from creating boilerplate code. You need to write what is necessary and no more. It made on me good impression and now I want to try more and check it on more complex architecture. Which is good, and which I expect from library like this.
This post is part of F# Advent Calendar 2020. Thanks to Sergey Tihon for running that event.
Photo comes from unsplash.com
Comments